
Integrating Multi-Site Google Analytics Data Using Google Apps Script
2025-05-09 10:00
TOC
本篇中文版:使用 Google Apps Script 串接 Google Analytics API,整合多站數據
What This Guide Solves
If your company operates multiple websites, checking their Google Analytics (GA) data typically means opening several browser windows side by side—a pretty tedious process.
But with the GA API, engineers can fetch data from each site and display it all on a single dashboard—no more juggling multiple GA accounts.
Listen in: Key takeaways from Google’s NotebookLM.
Step 1: Enable the GA API
Get Your GCP Project ID
First, you need a Google Cloud Platform (GCP) project. If you don’t have one, log into your Google account and create a new project.
Your project ID is shown on the GCP Dashboard:
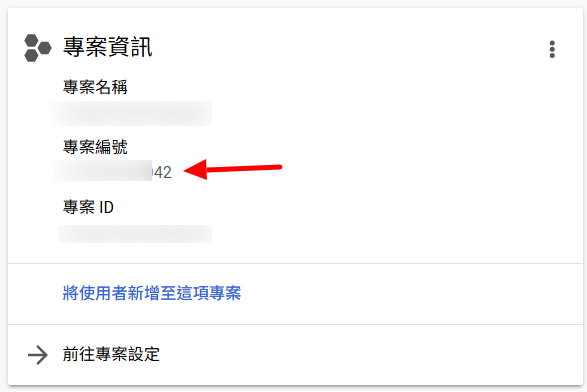
GCP Project ID
Enable the Google Analytics API
Before using the API, you’ll need to enable it in your GCP project.
In GCP, go to APIs & Services > Library:
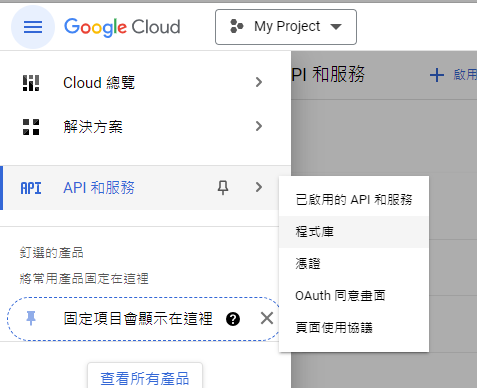
API Library in GCP
Search for Google Analytics Data API, then click into the result and hit Enable:
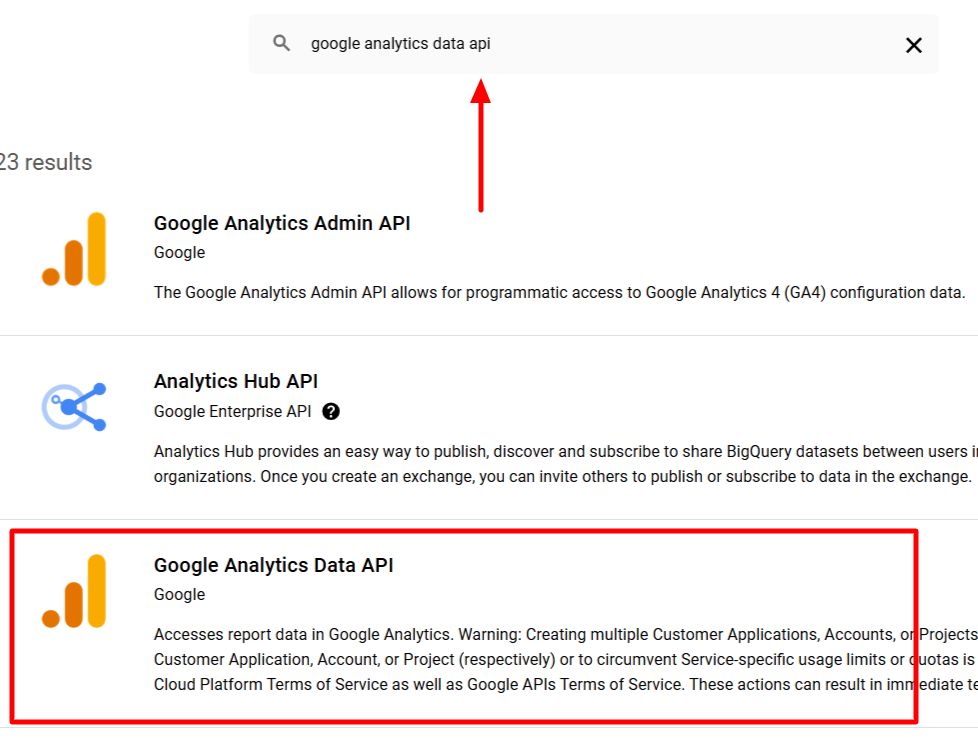
Search and enable Google Analytics Data API
Step 2: Get Your GA Property ID
In your GA Admin panel, click on “Property Settings”:
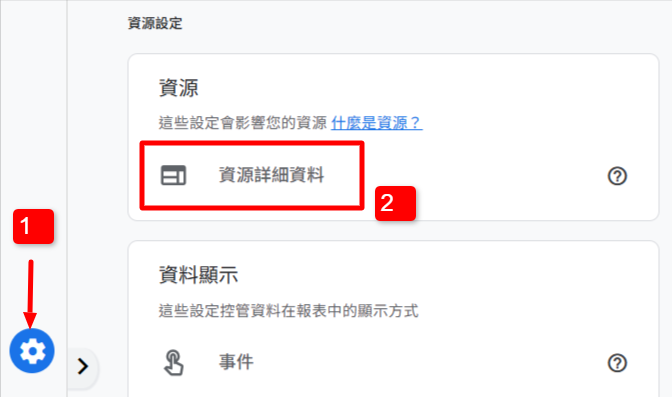
GA Admin Interface
You’ll find your property ID in the top right corner:
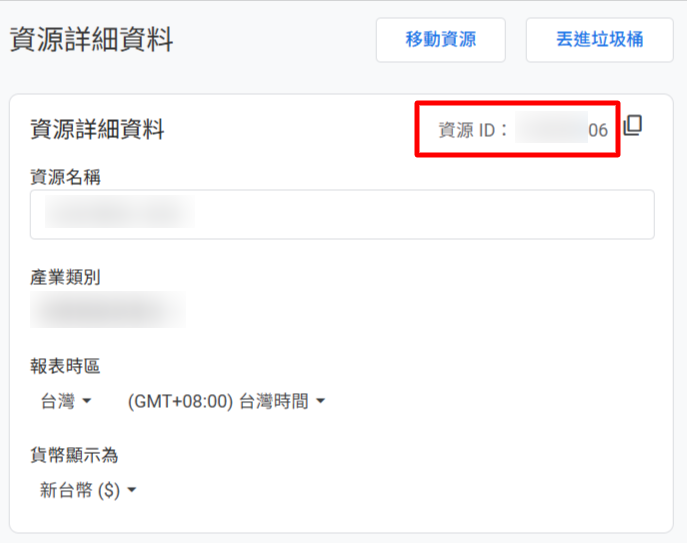
GA Property ID
Step 3: Write the Script in Google Apps Script
If you’re using the same Google account for both the GA property and Apps Script, you can skip OAuth authentication—super handy!
Create a New Project in Google Apps Script
Go to Google Apps Script and create a new project:
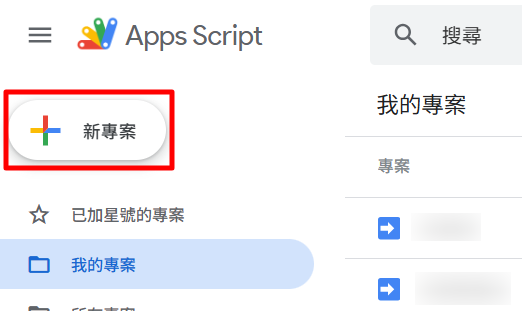
New GAS Project
Paste in the following code to get started.
Example 1: Total Page Views & Active Users
 1function getGA4Data() {
 2
 3  var apiUrl = `https://analyticsdata.googleapis.com/v1beta/properties/${propertyId}:runReport`;
 4
 5  var payload = {
 6    "dateRanges": [{
 7      "startDate": startDate,
 8      "endDate": "today"
 9    }],
10    "metrics": [
11      { "name": "screenPageViews" }, // 瀏覽數
12      { "name": "activeUsers" } // 活躍用戶數
13    ]
14  };
15
16  var options = {
17    "method": "post",
18    "contentType": "application/json",
19    "headers": {
20      "Authorization": "Bearer " + ScriptApp.getOAuthToken()
21    },
22    "muteHttpExceptions": true,
23    "payload": JSON.stringify(payload)
24  };
25
26  var response = UrlFetchApp.fetch(apiUrl, options);
27  var data = JSON.parse(response.getContentText());
28
29  // 檢查回應中是否有 rows 資料
30  if (data.rows && data.rows.length > 0) {
31
32    // 取得瀏覽數和活躍用戶數
33    var screenPageViews = data.rows[0].metricValues[0].value;
34    var activeUsers = data.rows[0].metricValues[1].value;
35
36    // 回傳資料
37    return {
38      "totalPageViews": screenPageViews,
39      "activeUsers": activeUsers
40    };
41
42  } else {
43    // 若無符合資料,則回傳 0 作為預設值
44    return {
45      "totalPageViews": 0,
46      "activeUsers": 0
47    };
48  }
49}
Example 2: Page Views for Specific Page Titles
Filter by titles that end with, say, “Member Center”:
 1var propertyId = "xxxxxx";  // 替換成 GA 的資源編號
 2var startDate = "2025-01-01", // 替換成想要從哪一天開始抓的日期
 3var pageTitle = "會員中心"; // 替換成想要篩選的頁面標題文字
 4
 5function getGA4DataPage() {
 6
 7  var apiUrl = `https://analyticsdata.googleapis.com/v1beta/properties/${propertyId}:runReport`;
 8
 9  var payload = {
10    "dateRanges": [{
11      "startDate": startDate,
12      "endDate": "today"
13    }],
14    "metrics": [
15      { "name": "screenPageViews" }, // 瀏覽數
16      { "name": "activeUsers" } // 活躍用戶數
17    ],
18    "dimensionFilter": {
19      "filter": {
20        "fieldName": "unifiedScreenName",
21        "stringFilter": {
22          "value": pageTitle,
23          "matchType": "ENDS_WITH"
24        }
25      }
26    }
27  };
28
29  var options = {
30    "method": "post",
31    "contentType": "application/json",
32    "headers": {
33      "Authorization": "Bearer " + ScriptApp.getOAuthToken()
34    },
35    "muteHttpExceptions": true,
36    "payload": JSON.stringify(payload)
37  };
38
39  var response = UrlFetchApp.fetch(apiUrl, options);
40  var data = JSON.parse(response.getContentText());
41
42  if (data.rows && data.rows.length > 0) {
43    var screenPageViews = data.rows[0].metricValues[0].value;
44    var activeUsers = data.rows[0].metricValues[1].value;
45    return {
46      "totalPageViews": screenPageViews,
47      "activeUsers": activeUsers
48    };
49  } else {
50    return {
51      "totalPageViews": 0,
52      "activeUsers": 0
53    };
54  }
55}
Example 3: Realtime Active Users
 1var propertyId = "xxxxxx";  // 替換成 GA 的資源編號
 2
 3function getGA4RealtimeData() {
 4
 5  var apiUrl = `https://analyticsdata.googleapis.com/v1beta/properties/${propertyId}:runRealtimeReport`;
 6
 7  var payload = {
 8    "metrics": [{
 9      "name": "activeUsers"
10    }]
11  };
12
13  var options = {
14    "method": "post",
15    "contentType": "application/json",
16    "headers": {
17      "Authorization": "Bearer " + ScriptApp.getOAuthToken()
18    },
19    "muteHttpExceptions": true,
20    "payload": JSON.stringify(payload)
21  };
22
23  var response = UrlFetchApp.fetch(apiUrl, options);
24  var data = JSON.parse(response.getContentText());
25
26  // 取得即時人數
27  return data.rows[0].metricValues[0].value;
28}
Example 4: Realtime Users on a Specific Page
 1var propertyId = "xxxxxx";  // 替換成 GA 的資源編號
 2var pageTitle = "會員中心"; // 替換成想要篩選的頁面標題文字
 3
 4function getGA4RealtimeDataPage() {
 5  var apiUrl = `https://analyticsdata.googleapis.com/v1beta/properties/${propertyId}:runRealtimeReport`;
 6
 7  // 在 payload 中新增 dimensions 和 dimensionFilter
 8  var payload = {
 9    "metrics": [{
10      "name": "activeUsers"
11    }],
12    "dimensions": [{
13      "name": "unifiedScreenName"
14    }],
15    "dimensionFilter": {
16      "filter": {
17        "fieldName": "unifiedScreenName",
18        "stringFilter": {
19          "value": pageTitle,
20          "matchType": "ENDS_WITH"
21        }
22      }
23    }
24  };
25
26  var options = {
27    "method": "post",
28    "contentType": "application/json",
29    "headers": {
30      "Authorization": "Bearer " + ScriptApp.getOAuthToken()
31    },
32    "muteHttpExceptions": true,
33    "payload": JSON.stringify(payload)
34  };
35
36  var response = UrlFetchApp.fetch(apiUrl, options);
37  var data = JSON.parse(response.getContentText());
38
39  var totalActiveUsers = 0;
40
41  // 累加所有匹配頁面的人數
42  if (data.rows && data.rows.length > 0) {
43    data.rows.forEach(function (row) {
44      totalActiveUsers += parseInt(row.metricValues[0].value, 10);
45    });
46  }
47
48  return totalActiveUsers.toString(); // 返回所有匹配頁面的總人數
49}
Step 4: Handling API Calls Based on Parameters
Add logic to respond to different requests based on a type parameter:
 1// 回應錯誤訊息
 2function createErrorResponse(message, code) {
 3  var errorResponse = {
 4    success: false,
 5    error: message,
 6    code: code || 400,
 7    timestamp: new Date().toISOString()
 8  };
 9  var jsonOutput = ContentService.createTextOutput(JSON.stringify(errorResponse));
10  jsonOutput.setMimeType(ContentService.MimeType.JSON);
11  return jsonOutput;
12}
13
14// 處理 POST
15function doPost(e) {
16  // 確認有傳入內容
17  if (!e.postData || !e.postData.contents) {
18    return createErrorResponse("無效請求:未收到 POST 資料。" + e.postData);
19  }
20
21  // 將 POST 資料解析成 JSON
22  var requestData;
23  try {
24    requestData = JSON.parse(e.postData.contents);
25  } catch (error) {
26    return createErrorResponse("JSON 格式無效。");
27  }
28
29  // 檢查是否有 type 參數
30  if (!requestData.type) {
31    return createErrorResponse("缺少「type」參數。");
32  }
33
34  var output;
35
36  // 根據 type 參數執行不同的邏輯
37  switch (requestData.type) {
38    // 瀏覽量、活躍人數
39    case "data":
40      var reportData = getGA4Data();
41      output = {
42        "totalPageViews": reportData.totalPageViews,
43        "activeUsers": reportData.activeUsers
44      };
45      break;
46    // 瀏覽量、活躍人數:指定頁面標題
47    case "dataPage":
48      var reportData = getGA4DataPage();
49      output = {
50        "totalPageViews": reportData.totalPageViews,
51        "activeUsers": reportData.activeUsers
52      };
53      break;
54    // 即時人數
55    case "realtimeData":
56      var reportData = getGA4RealtimeData();
57      output = {
58        "activeUsers": reportData
59      };
60      break;
61    // 即時人數:指定頁面標題
62    case "realtimeDataPage":
63      var reportData = getGA4RealtimeDataPage();
64      output = {
65        "activeUsers": reportData
66      };
67      break;
68    default:
69      return createErrorResponse("type 錯誤");
70  }
71
72  // 回傳 JSON 格式的結果
73  var jsonOutput = ContentService.createTextOutput(JSON.stringify(output));
74  jsonOutput.setMimeType(ContentService.MimeType.JSON);
75  return jsonOutput;
76}
Step 5: Link Your Script to GCP
In the left sidebar, go to Project Settings and scroll down to link your GCP project using the ID from earlier:
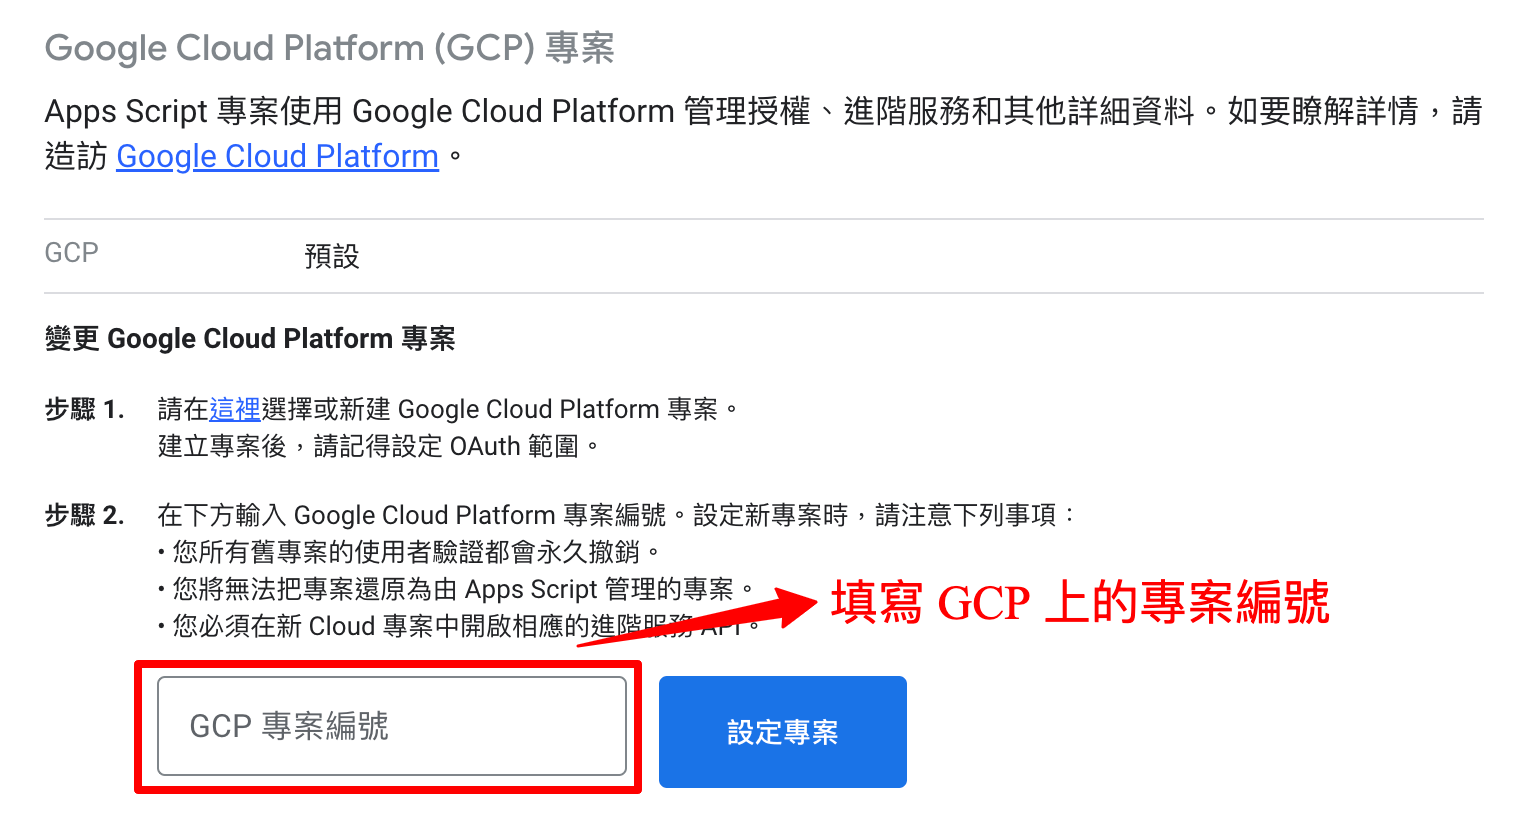
Link to GCP Project
Step 6: Deploy the Script
To make your script accessible via API:
- Click Deploy > Manage Deployments.
- Choose Web App as the deployment type.
- Set access to Anyone.
Once deployed, you’ll get a public URL—this is your API endpoint.
Step 7: Fix Permissions If Needed
If your response always returns 0, it’s likely a permissions issue.
- Go to Project Settings and check the box to show
appsscript.json. - Add these scopes:
1"oauthScopes": [
2"https://www.googleapis.com/auth/script.external_request",
3"https://www.googleapis.com/auth/analytics.readonly"
4]
Redeploy and approve all permission prompts. You’re good to go!
Full Source Code
You can find the full code here: Complete Script on GitHub Gist
Translated by ChatGPT.